DIY – wall of light for photographers. How to create a faux window in your photography studio

Hi, I’m Judy — a newborn photographer based in Aberystwyth. I love creating bespoke portraits using beautiful props and accessories, while keeping everything natural and timeless.

For years, I dreamed of having more space to create soft, natural images in my tiny studio — and I only wish I’d built my Wall of Light sooner!

Alongside newborn sessions, I also specialise in maternity, baby, family & business photography in Aberystwyth and Ceredigion. The Wall of Light now allows me to create simple, stunning portraits with ease — no matter the weather.

Let’s get started…

What Is a Wall of Light?

A Wall of Light is essentially a “fake window,” created using LED light panels (the same type you often see in shop ceilings). It helps maximise studio space and produces beautifully natural-looking images — without relying on unpredictable daylight.

This means consistent lighting, effortless sessions, and timeless photographs every time.

 On the bottom of this page you will find examples of photos taken using each wall of light. Number 2 & 4 give the same results.

photography studio, fake window in the corner

HOW TO BUILD A WALL OF LIGHT?

There are lots of different ways to build your wall of light. People usually build frames for them or mount them straight on the walls. I have built 4 types of wall of light and I will tell you more about them below:

1. Square panels on 3 separate frames on wheels – with 3 separate light switches.

2. Square panels on mdf structure – with 3 separate light switches

3. LED battens on a clothing rack

4. Square panels mounted to MDF board – this would work with wall mounting if electrics were put on one side. This was the first wall of light I built and whole process is described in detail on the bottom of this blog.

WHAT I DID & WHY I DID DIFFERENTLY NEXT TIME – STEP BY STEP

I will show you what I have done but also note down what I think would have been better & more practical. I will list all the materials used on the bottom of this post so they are easily accessible.

STEP 1: decide how big you want your WOL to be & design it – these are all my rough ideas on paper. My electrician built the frame in the middle and did the drawing – he is definitely more tidy than me!


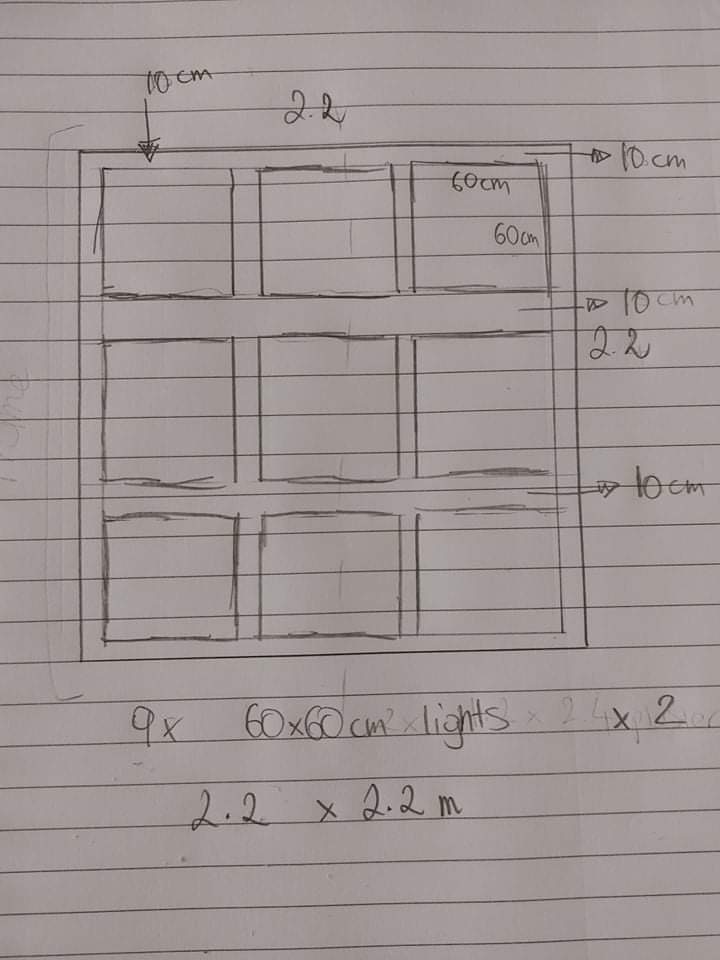
STEP 2: Order your LED lights. I went for square 60x60cm lights – some people prefer 120xm lights, but I am happy with these. They look like old windows.

I ordered 9 lights each, 6000K cool white ones. I was worried about the ‘cool’ part, but they photograph just right. PRO TIP: the temperature of LED lights is the opposite of the K we work with – 4500K is warmer than the 6000K – consider this when ordering.

 PRO TIP 2: Don’t obsess over how many W the lights are. The brightness is determined by the lumens (lm). Square panels are 4000lm & battens are 2200lm.

Also remember to make sure that your lights have a flicker free LED driver – some lights seem cheaper, but are flickering!

For the batten lights WOL – I ordered from amazon, 6500K super bright white. These are less powerful than the squares so I wanted brightness.

Each light is £18-£20 depending where you order from, so a set of 9 will cost you £162-£180. When building my second wall of light I went for 4 x 4 so 16 lights in total. 

STEP 3: DIFFERENT WAYS TO MOUNT YOUR LIGHTS:

1. MY FAVOURITE WALL OF LIGHT ON 3 SEPARATE FRAMES

 They can be used separately or together like one big window. Frames are on wheels however they are VERY heavy – if I was going to build them again I would use slightly thinner, lighter wood.

PROS: looks nice and tidy, can be moved, can be used as 3 separate lights, lots of storage behind

CONS: takes up more space, very heavy.

Lights have 3 separate switches – one for first row of three, second for the middle 6 squares and third for last row of 3. This way I can create more moody maternity or empowerment photographs.

Size of the base with wheels is about 35cm from the wall, which is definitely not ideal for small spaces.

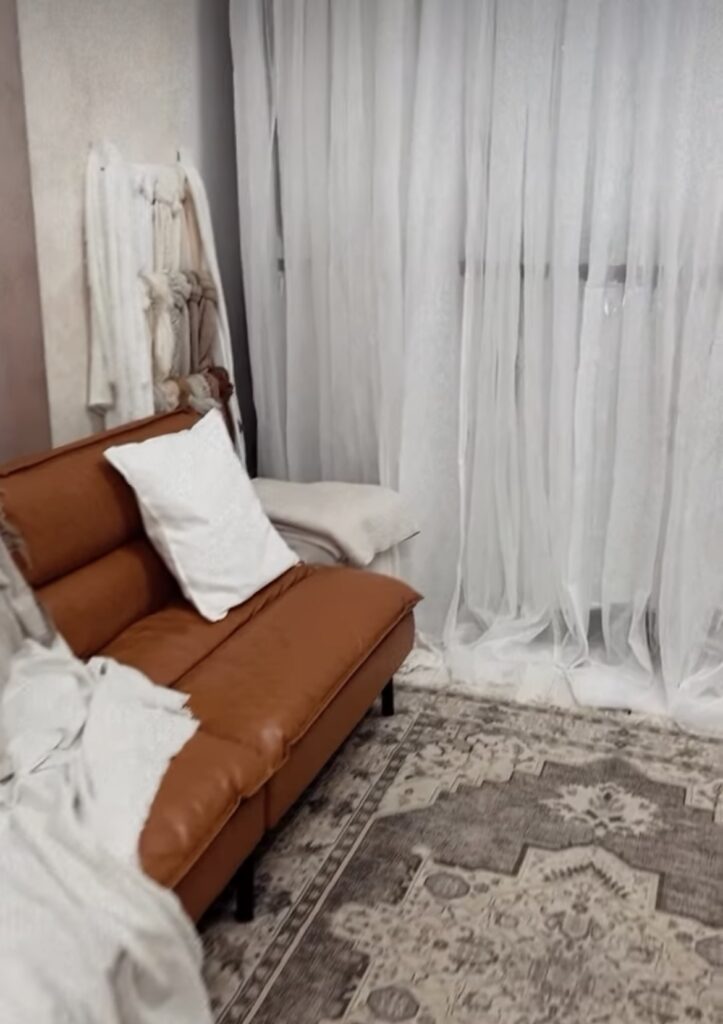
 I used the new large curtains from ikea and love them! They are super wide and 250cm drop. I have 4 of this: LINK

2. Structure made out of MDF offcuts.

I had some thinner MDF board left and I was on a budget. I knew this wall of light was going to be mounted to the wall, so I decided to build a frame for it. It is FLIMSY AS HELL to make. The idea of building a lighter frame rather than using a huge mdf board is great, but for love of God – do not use MDF like this. It was a nightmare to put together. It does the job though and I had no issues with it. It is mounted to the wall on top and bottom. Last panel has hinges so I can tilt it and have more light on the subjects. I actually LOVE editing images taken with this wall of light, they are nice and moody with lovely tones.

PROS: much cheaper to make, takes up less space

CONS: smaller, flimsy, doesn’t look as tidy

Link to curtains is on the bottom of the page. 

3. CLOTHING RAIL & LED BATTENS

Well this one was a last minute project when my adhd was having a field day. I found a clothing rack which was big enough, ordered the lights from amazon and built everything the next day! No electrician needed, but someone will have to attach the wires to a plug for you. After watching it done I could easily do it myself – but always think about safety & insurance!

This is a moody, less bright light. If you add more lights it will be brighter, but I only use it for maternity, mum, dad & newborn portraits, breastfeeding, children on their own or boudoir – I like the less powerful light for these photos. I recently used it for maternity backlit image and it worked perfectly fine!

Steps for this one are easy: 

Get your clothing rack 6ft x 7ft is what I got (£42) LINK

Get your lights 2 x 8 lights = £136 LINK

Get strong double sided velcro tape £21 LINK

Get reflective silver fire blanket and tape to the back of the clothing rail – this will reflect the light and make it stronger.

Put one velcro on your rail and one side on the light and then connect the lights – make sure you look at the cable plugs and place the lights the right way. Follow the instructions in the light box, it’s easy enough!

I have secured some bits with cable ties and used a long garden bamboo stick to hang my curtains. I used simple textured curtains from b&m £6 a pack. I have 8 curtain panels in total. I dont have great images for this one, but will update everything shortly!

4. LARGE MDF BOARD

I opted for mounting the lights onto 9mm MDF board. Each board was 2.4m by 1.2m – I needed 2 boards. I cut the boards to size I needed and joined together with flat brackets – the whole size of the board we created was 2.1×2.1m. I placed 10 brackets along the joint, drilling 4 holes, 2 on each side, securing the brackets with bolts and nuts. Set of two boards to create one wall of light was £65 from local store.

BUT if I was doing them again I would purchase different size boards and create 3 vertical boards with 3 lights on each – this way they would be easier to move around. However if your wall doesn’t need to be moved easily, just go for one large board!

STEP 4: MOUNT YOUR LIGHTS TO YOUR FRAME / BOARD

Make brackets to mount your lights on the board. I wanted the lights to be easily removed from the board when needed, I didn’t want to drilli holes in the lights and damage them by accident. I wanted a U shape bracket to pop slide the lights in. All the brackets were very expensive, so I decided to make my own. Later I discovered that extra large round washers were perfect to hold the lights in place and there was no need for brackets. This is the way I mounted all other lights. 

You can also purchase special frames to make light mounting easy, but I didn’t see the point in spending more money.

TIP: Paint your board white between the lights, it will look nicer.


STEP 5: Once all your lights are on the board it is time to wire them together. I have hired a certified electrician to do it for us. One wall of light cost me £110. The electrician drilled holes in the board and hid all the wires behind trunking at the back of the board. Neat & non messy look. For the big wall of light I did a service swap with my electrician. He did the frames and wiring for me and I took photos for him – definitely worth a try!

STEP 6: Make sure your board is safe & secure. I used a 2.4m wooden curtain pole from argos, whoch was £15. You can use anything that will stop your board from falling. For the flimsy wall I just drilled it into a beam that i have drilled into the wall.

STEP 7: Curtains! It’s time to make it all pretty. I would say about 3 curtain panels per light work great. You can find links to ones I used in this blog. There are also beautiful curtains from Dunelm in cream, but unfortunately too short for my large wall of light LINK

STEP 8: Have a play around! Every space will be different depending on how much light you let in from other sources. My space is very dark where myt big wall of light is. Where wall number 2 is it’s completely blacked out. For my Christmas mini sessions I have used a LED fill light just to have more light on the faces. I don’t really know how much difference it made as I do find it’s a struggle with larger groups and smaller wall of light. The light itself is great, it’s Neewer round LED right LINK

My basic settings are SS 250-400 – definitely 400 for moving babies & toddlers! F 2.8 – 4 depending on what session it is ISO 100-400 I always have my white balance set to K.

List of materials used for the MDF wall of light:

LED lights 6000K 60x60cm = £162 LINK

MDF boards, two  2.4 x 1.2m, 9mm thickness – cut to size or left as they are, it’s up to you. £65 in total from local building supplies store

IKEA voile curtains for wall 5 (pairs) x £10 = £50 LINK

Other bits like screws, bolts, curtain wire etc = £50

Electrician – £110


Total: £437

I also purchased a circular saw from screwfix as I know I will use it again, it is great and on sale for £25. LINK

Please note that this is something I came up with, i cannot guarantee the safety of the wall in any way. Please double check all the tools, accessories and supplies fit together as I purchased everything in screwfix store to ensure it all goes together. Any questions – let me know!

Thank you everyone with a wall of light who answered my questions before I built it.

WALL OF LIGHT 1 EXAMPLES:

WALL OF LIGHT 2 & 4 EXAMPLES

Pregnant woman in Aberystwyth photography studio, lying down on a sofa in a boho set up

WALL OF LIGHT 3 (BATTENS) EXAMPLES:

Facebook
Twitter

Leave a Reply

Your email address will not be published. Required fields are marked *